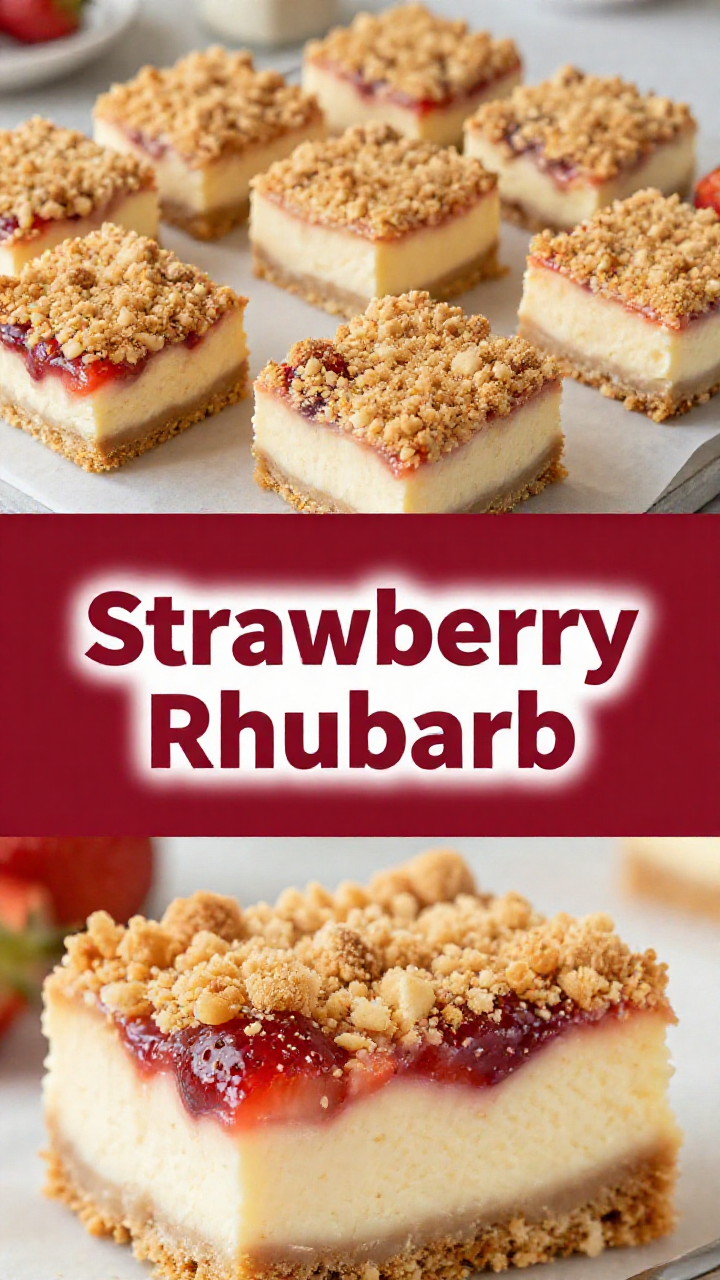
Hello, baking besties! Lina here, ready to sprinkle some magic (and maybe a little flour) into your kitchen. Today, we’re diving headfirst into a dessert that screams springtime: Strawberry Rhubarb Cheesecake Bars. Trust me, these aren’t your grandma’s rhubarb recipes (unless your grandma is secretly a culinary genius, then carry on!).
I’m talking about a buttery crumble base, a creamy cheesecake layer, and a tangy-sweet strawberry rhubarb topping that’ll make your taste buds sing. If you’re anything like me, you’re already drooling. So, grab your aprons, and let’s get baking!
Why You’ll Love This
Okay, let’s be real. Why *wouldn’t* you love these bars? But just in case you need convincing, here’s the lowdown:
- Flavor explosion: The sweet strawberries perfectly balance the tart rhubarb, creating a symphony of flavors.
- Texture heaven: From the crunchy crumble to the smooth cheesecake, every bite is a delight.
- Impressive yet easy: They look fancy, but I promise they’re totally doable, even for kitchen newbies.
- Perfect for any occasion: Potlucks, picnics, or just a Tuesday night treat – these bars are always a hit.
- Did I mention cheesecake?: Because, well, cheesecake. Need I say more?
Ingredients
- Butter (112g/1 stick): At room temperature, for that perfect crumble.
- Brown Sugar (43g/1/3 cup): Lightly packed, for a touch of molasses-y goodness.
- Cinnamon (1/2 tsp): Adds warmth and a hint of spice.
- Kosher Salt (1/4 tsp): Enhances all the flavors.
- Whole Wheat Flour (125g/about 1 cup): Adds a nutty flavor to the base.
- Rolled Oats (33g/1/3 cup): For that irresistible crumble texture.
- Quick Oats (33g/1/3 cup): Helps bind the crumble together.
- Cream Cheese (450g/16 oz/2 bricks): At room temperature, because nobody likes lumpy cheesecake.
- Granulated Sugar (75g/3/8 cup): For sweetness, obviously.
- Greek Yogurt (70g/about 1/3 cup): Adds tang and moisture to the cheesecake layer.
- Heavy Cream (20g/1 tbsp + 1 tsp): For extra richness.
- Vanilla Extract (1 tsp): A flavor enhancer.
- Large Eggs (1 1/2): The easiest way to do this is by weight – half an egg is 25g, but if you don’t have a scale, try whisking an egg and measuring out 1 1/2 tbsp for the half egg.
- Cornstarch (1 1/2 tbsp): Helps stabilize the cheesecake.
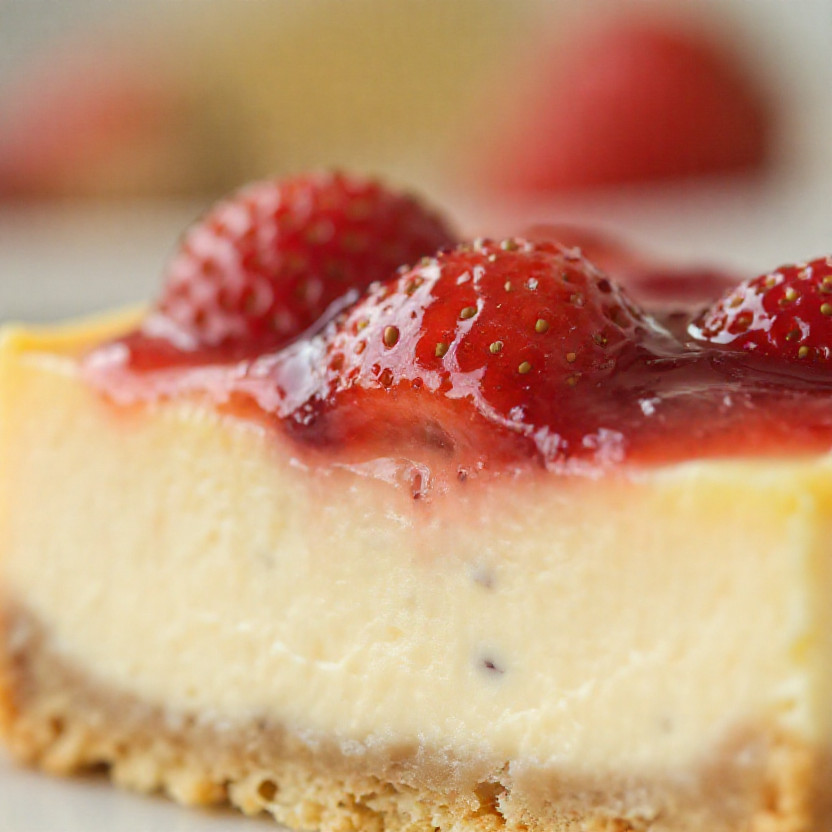
- Chopped Rhubarb (115g/about 1 cup): The star of the show!
- Chopped Strawberries (115g/about 1 cup): Adds sweetness and complements the rhubarb perfectly.
- Granulated Sugar (2 tsp): To sweeten the fruit.
- Tapioca Starch (1 tsp): Helps thicken the fruit filling.
Instructions
- Get Ready to Bake: Preheat your oven to 350°F (175°C). Butter an 8″ square baking tray and line it with a parchment sling (this makes removing the bars a breeze!).
- Make the Crumble: Cream together the butter, brown sugar, cinnamon, and salt. Mix in the flour and oats until it forms clumps. Reserve 1/3 of this mixture for the topping.
- Press the Base: Take the remaining 2/3 of the crumble mixture (about 220g) and press it firmly into the bottom of the prepared tray. Prick it all over with a fork.
- Chill and Bake: Pop the base in the freezer for 10 minutes to firm up. Bake for about 15 minutes, or until lightly browned. Let it cool slightly.
- Cheesecake Time: In a large bowl, beat the cream cheese until smooth. Mix in the sugar, yogurt, cream, and vanilla. Beat in the eggs, then sift in the cornstarch and mix until combined. This is the cheesecake layer.
- Assemble the Bars: Pour the cheesecake layer over the partially baked crust.
- Add the Fruit: Stir together the rhubarb, strawberries, sugar, and tapioca starch. Spoon it evenly over the cheesecake.
- Crumble Topping: Break up the reserved crumble mixture and scatter it over the fruit.
- Bake Again: Return the pan to the oven and bake for another 30-35 minutes, or until the crumble is golden brown and the cheesecake is mostly set (a little jiggle is okay!).
- Cool and Chill: Let the bars cool completely, then refrigerate for at least 4 hours (or overnight) to set.
- Serve: Run a knife along the edges to loosen the bars, then cut into squares and enjoy!
Pro Tips for Perfect Bars
- Room Temperature is Key: Make sure your butter and cream cheese are at room temperature for a smooth, lump-free cheesecake layer and a perfect crumble.
- Don’t Overbake: Overbaking will result in a dry cheesecake. A slight jiggle in the center is what you’re aiming for.
- Parchment Sling is Your Friend: Trust me, this makes removing the bars from the pan so much easier.
- Chill Time is Crucial: Don’t rush the chilling process. It’s essential for the cheesecake to set properly.
- Use a Serrated Knife: For clean cuts, use a serrated knife to slice the bars.
Common Mistakes to Avoid
- Lumpy Cheesecake: Ensure your cream cheese is properly softened and beat it until completely smooth before adding other ingredients.
- Dry Crumble: If your crumble seems too dry, add a tablespoon of melted butter at a time until it comes together.
- Soggy Base: Pricking the base with a fork prevents it from puffing up and becoming soggy.
- Overbaking: Keep a close eye on the bars and don’t overbake. A slight jiggle in the center is okay!
Variations to Spice Things Up
- Berry Bonanza: Swap the strawberries and rhubarb for other berries like blueberries, raspberries, or blackberries.
- Citrus Zest: Add lemon or orange zest to the cheesecake layer for a bright, citrusy twist.
- Nutty Crumble: Add chopped nuts like pecans or walnuts to the crumble topping for extra crunch and flavor.
- Chocolate Swirl: Swirl melted chocolate into the cheesecake layer for a decadent treat.
- Ginger Snap Base: Use crushed ginger snaps instead of the oat crumble for a spicy kick.
Storage Tips
- Refrigerator: Store leftover bars in an airtight container in the refrigerator for up to 5 days.
- Freezer: For longer storage, freeze the bars for up to 2 months. Wrap them individually in plastic wrap and then place them in a freezer-safe bag or container. Let them thaw in the refrigerator before serving.
Frequently Asked Questions
- Can I use frozen rhubarb and strawberries?: Yes, but make sure to thaw them completely and drain any excess liquid before using.
- Can I make these bars gluten-free?: Absolutely! Use a gluten-free flour blend and gluten-free oats for the crumble.
- Can I use a different size pan?: Yes, but you may need to adjust the baking time. A 9×13 inch pan will result in thinner bars, so reduce the baking time accordingly.
- Why is my cheesecake cracking?: This is usually due to overbaking or sudden temperature changes. Avoid overbaking and let the bars cool gradually in the oven before transferring them to the refrigerator.
- Can I make these ahead of time?: Yes! In fact, these bars are even better the next day after the flavors have had a chance to meld together.
Serving Suggestions
- Classic: Serve the bars chilled as is.
- Whipped Cream: Top with a dollop of freshly whipped cream for extra indulgence.
- Ice Cream: Pair with a scoop of vanilla ice cream for a decadent dessert.
- Fruit Sauce: Drizzle with a homemade fruit sauce like raspberry or strawberry for added flavor.
- Coffee or Tea: Enjoy with a cup of coffee or tea for a perfect afternoon treat.
So there you have it, friends! My take on Strawberry Rhubarb Cheesecake Bars. The cheesecake, it’s a guaranteed crowd-pleaser. I’m pretty sure these bars will become a new family favorite. If you give it a try, let me know what you think! And don’t worry if things get a bit messy – that’s half the fun! Happy baking! This recipe is inspired by my mum’s love for baking, so I hope you enjoy it as much as we do. Now go forth and create some deliciousness! And remember, even if your bars aren’t perfect, they’ll still taste amazing. After all, it goes without saying that homemade is always better. If you have any questions, don’t hesitate to ask. I like to think of my mum’s recipes as a starting point, so feel free to adapt them to your own tastes. My mum’s version always included a bit of extra cinnamon, so I’ve kept that tradition alive. Until the next baking adventure!

strawberry rhubarb cheesecake bars
Ingredients
Method
- Preheat oven to 350F. Butter an 8″ square baking tray and line with parchment.
- Cream butter, brown sugar, cinnamon, and salt. Mix in flour and oats. Reserve 1/3 for crumble. Press remaining 2/3 into the tray.
- Prick the base, freeze for 10 minutes. Bake for 15 minutes until lightly browned. Cool slightly.
- Cream cream cheese until smooth. Mix in sugar, then yoghurt, cream, and vanilla. Beat in eggs. Sift in cornstarch.
- Pour cheesecake layer over crust.
- Stir rhubarb, strawberries, sugar, and tapioca starch. Spoon over cheesecake.
- Break up remaining crumble and scatter over fruit.
- Bake for 30-35 minutes until browned and cheesecake is mostly set.
- Cool, then refrigerate for at least four hours. Cut into squares.
Notes